Making
Signature Items
You can usually
tell where Team Kender has been now by our signature items left in a cache.
These are various things that are roughly the size of the rubber stamp I had
made of our signature logo. Currently there are rocks that are shaped like
skipping stones and "gold" doubloons.
First thing was getting the stamp made. I came up with a design I thought
would work well in describing what we are like without being too complicated
and still looking like something that might be found on a coin. Once I drafted
the design I sent it off to a rubber stamp maker to have it produced. Plus
shipping to have a rubber stamp of 1.5 x 1.5 inches made was around $16 U.S.
I browsed at a local crafts shop to find another stamp that would be fitting
to use on the other side. I found a small stamp of Celtic knotwork for about
$5.
Next was deciding what it should be stamped on. I deliberated for a while,
thinking about metal slugs like you find punched out of electrical boxes or
using wooden nickels or possibly clay. I finally decided the first experiments
would be with clay. First came the doubloons, made from DAS air-drying clay.
This is not the easiest medium to work with as it dries pretty quickly, so
it needs to be shaped and stamped pretty fast. If you don't, the details will
have cracks in them as you imprint the stamp in the clay.
* What I did was to use a plastic disposable spoon to scoop out a hunk of
clay about half the size of a golf ball.
* I hand rolled it into as perfect of a sphere as possible. Then I used a
nice flat surface to squish it flat into a coin shape.
* Then I quickly though carefully and evenly pushed the Celtic
knotwork rubber stamp into the surface.
* Then I flipped the coin over and stamped with the Kender logo in the same
manner. I did the knotwork first because it is the secondary image and isn't
needed to be as clear as the logo side. So when pressing the Kender logo the
knotwork gets very slightly squished, but is still readable.
* Once both sides are stamped I used an exacto knife to cut away the edges
of the coin at an angle. This made the coin into hexagonal or other various
sided shapes. This was for two reasons: 1) as the clay was flattened, the
edges were already cracking, so cutting them away made for a cleaner edge
2) I think the hexagonal outline harkens to older, exotic and more fascinating
look.
* DAS air dries in about 24 - 48 hours depending on your weather conditions.
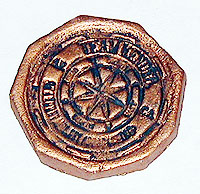
* Once it is completely dry I painted it with Testers enamle model paint.
I put a base coat of flat black in the detailed areas where it was stamped.
Once that dried I then painted the entire coin with Testers metalic enamle
paint. In this case I used Brass. In the stamped area try to just brush the
metalic paint on very lightly, try to avoid filling all the indentation details
of the stamp that have black in them. This way your details are still highlighted
in black. The final product looks like this
The next
experiment was to make skipping stones. Basically it was the exact same process
as above. But I will note the differences. The rocks are made from Sculpey
Granitex, which is a polymer clay that has a rock-like look. It is a clay
that you have to bake to harden (20 minutes at 275 degrees). Unbaked Polymer
clay is oily and shouldn't come into contact with household surfaces as it
will possibly permenently mar the surface. Always work with this clay on top
of paper or other protective surfaces so you don't screw up your furnature
or house wares, this includes baking sheets, etc. When baking cover the cookie
sheet with aluminum foil before putting the raw clay on it.
* Sculpey tends to come in small blocks that have 4 segments. It works well
to use 1 segment per stone.
* I rolled the clay out into a ball and then squished it basically flat. I
actually did this with an Altoids tin because it is small and managable. I
shaped it into more natural looking rock shapes, putting deformities into
them with the bottom of the Altoids tin.
* Once the shape looked good I pressed the Celtic knotwork rubber stamp into
stamping ink pad and then lightly pressed it on paper to take off some of
the ink, but not all of it.
* Then I pressed it into the clay like with the doubloon. I turned it over
and did the same steps with the Kender logo stamp.
* because the clay already has a stone look, it is not required to paint it.
* I preheated the kitchen oven to 275 degrees and placed the stones onto an
aluminum foil-wrapped cookie sheet. When the oven was ready I baked the stones
for 20 minutes. Sculpey is non-toxic so it will not harm your oven and the
fumes should not hurt you.

Price rundown
for both styles:
$16 for custom rubber stamp from Simon
Stamps
$5 for Celtic stamp
$4 for ink pad
$8 for 2.2 lbs of DAS air drying clay (enough to make probably 50 doubloons)
$2.75 for each package of Sculpey (makes 4 coins or rocks per package)
For a lot of other ideas for making interesting items in Sculpey, visit their
website. You can find a
more in-depth description of this same basic method I'm using here,
under the pdf file "Decorative Rocks".